Mail Server with CentOS 7
Table of Contents
- Introduction
- Installing CentOS 7
- Install BIND and create DNS records
- DNS Configuration
- Disabling SELinux
- Installing Postfix
- Installing Dovecot
- Installing Roundcube
- Securing Postfix and Dovecot with SSL
- Email client configuration
- Route outbound mail to a smart host
- Sender Policy Framework (SPF) TXT record
- Increase message size
- Mail filtering with SpamAssasin & ClamAV
- Disabling IPv6
- Hardening and tweaking Apache
- Roundcube Plugins
- Name Resolution Order
- Configuring Apache with a Trusted CA Certificate
- Configure DKIM and DMARC
- Enable TLS in Postfix
Introduction
While hosting your own Mail Server can be challenging and requires some know-how, it does demonstrate ones skill in understanding all the moving components that is needed to get one up and running.
Years ago when I hosted my own, it was on premise, ran on a HP MicroServer N40 and then on a G8, was an all-in-one using CentOS 6 and then 7, DNS (BIND), mail (Postfix MTA and Dovecot for MDA), webmail (Roundcube), mail filtering (SpamAssassin) and two-factor authentication using Google Authenticator.
It was fun piecing it all together and hosting it with the host and network gear backed by a UPS; not bad for a home set up. This kit ran for years and the only issue with a PSU failure and the odd disk swap running conventional desktop drives.
Linux distributions differ in terms of repositories, packages and support. While I'm more partial to Debian and its derivatives, I choose CentOS with its close ties, codebase and support from Red Hat.
Mail servers require effort to rebuild, choosing CentOS backed by a 10 year long term support was the key deciding factor. Most popular distributions have varying packaging and support options; choose wisely.
In the end, foreseeing the absence of a static IP before moving to NBN and the ongoing costs to host on premise (power, maintenance and replacement hardware) wasn't stacking up. Also, the security you get from G Suite, Microsoft 365, etc... can't be beat; with all the machine learning and advanced threat prevention, I decided to migrate off it and not have to worry whether the mail server was going to fail whenever I went on holidays, patching, testing new versions of features, etc...
I documented all the steps below to prepare and set up a complete mail server. With every CentOS build, the packages and details in the configuration may change over time.
Installing CentOS 7
I won’t go into the details of installing CentOS as this varies between different use cases. My build had two partitions (root / using ext4 and a swap partition) on top of a MDADM RAID 1 array running on a bare metal HP MicroServer.
If your server is virtualized, run with the recommended or desired partition types, sizes and layouts. In any case, have the base build installed, all hardware functional and packages updated before proceeding, and restart for any kernel upgrades:
yum check-update
yum update
Install BIND and create DNS records
yum install bind
touch /var/named/magrin.one.hosts
Specify your TTL, domain name, SOA, admin address, refresh times, two 'A' and 'NS' records and a MX record.
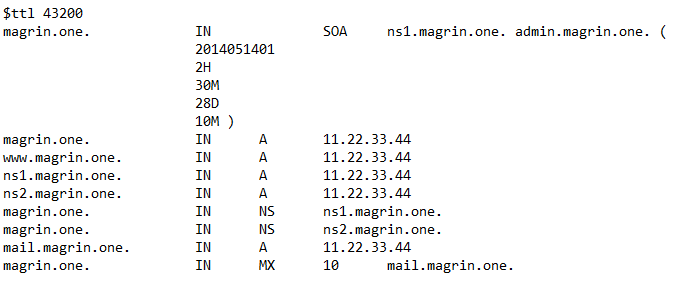
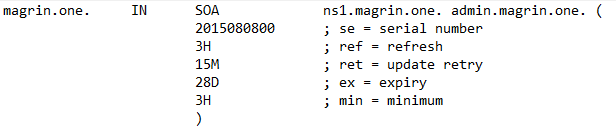
- Serial — the zone serial number, incremented when the zone file is modified, so the slave and secondary name servers know when the zone has been changed and should be reloaded.
- Refresh — the time between update requests from secondary and slave name servers.
- Retry — the time the secondary or slave will wait before retrying when the last attempt has failed.
- Expire — the time which a master or slave will wait before considering the data stale if it cannot reach the primary name server.
- Minimum — previously used to determine the minimum TTL, this is used for negative caching. This is the default TTL if the domain does not specify a TTL.
- TTL (time to live) - The number of seconds a domain name is cached locally before expiration and return to authoritative name servers for updated information.
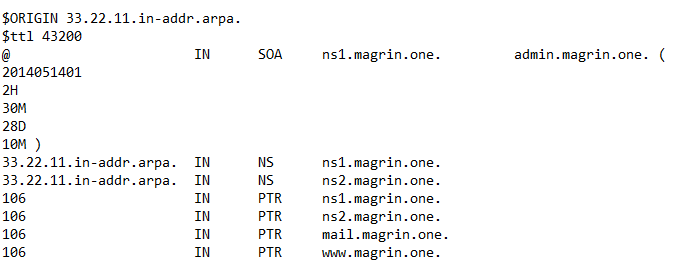
Create a reverse zone file:
touch /var/named/33.22.11.in-addr.arpa
Populate it with the required pointer (PTR) records:
Edit the /etc/named.conf file with the required changes
Important: Disable transfers and recursion to mitigate being compromised and advertising poisoned caches to other DNS servers.
As we're only concerned about advertising and resolving querying to our own hosts/records, recursion is not required. You don't need to resolve queries to external resources that are not yours!
listen-on port 53 { 192.168.0.11; };
listen-on port 53 { 127.0.0.1; };
version "";
allow-transfer { "none"; };
allow-recursion { "none"; };;
recursion no;
zone "magrin.one" {
type master;
file "/var/named/magrin.one.hosts";
};
zone "33.22.11.in-addr.arpa" {
type master;
file "/var/named/33.22.11.in-addr.arpa";
};
After creating your zone files and modifying named.conf, restart/reload the service;
systemctl named restart
systemctl named reload
yum install bind-utils
Finally test that named works by looking querying its record via dig
dig A magrin.one @192.168.0.11
DNS Configuration
With your Domain Registrar, we will need to create two sets of DNS records; a pair of A records for the DNS server and another pair of nameserver (NS) records . Start by creating the two 'A' records pointing to a single public IP address of your DNS Server:
A Record = ns1.magrin.one > 11.22.33.44
A Record = ns2.magrin.one > 11.22.33.44
At a minimum you will need two A and NS records for your DNS server. You can use the same address if you only have one public IP.
Now create two 'NS' records from the two created 'A' records created earlier:
NS Record = ns1.magrin.one > 11.22.33.44
NS Record = ns2.magrin.one > 11.22.33.44
Apply these changes to propagate your records. Depending on your TTL/refresh/Domain Registrar, propagation may take several minutes to hours or even a day. Read more here.
Disabling SELinux
While it's best practic to enable and properly configure SELinux, for the purposes of this set up, we will disable it to ensure the build is functional. To disabling SELinux:
nano /etc/selinux/config
SELINUX=disabled
Save and close. You'll also need to restart CentOS for this to take effect.
Installing Postfix
Postfix will be the Mail Transfer Agent (MTA). It's job is to route emails to their destined MTA (recipients mail server), using the Simple Mail Transfer Protocol (SMTP). Begin by installing Postfix:
yum install postfix
Modify the /etc/postfix/main.cf file and update the following options:
myhostname = mail.magrin.one
mydomain = magrin.one
myorigin = $mydomain
inet_interfaces = all
mydestination = $myhostname, localhost.$mydomain, localhost, $mydomain
mynetworks = 192.168.1.0/24, 127.0.0.0/8
home_mailbox = Maildir/
Enable Postfix to start during boot up and start the service:
systemctl enable postfix
systemctl restart postfix
systemctl status postfix
To check functionality, use telnet to connect and send a test email:
telnet localhost smtp
ehlo localhost
mail from: user@magrin.one
rcpt to: admin@magrin.one
data
test
.
quit
Note: If you are unable to connect, make sure the firewall isn't blocking the required incoming ports, the Postfix service is running, configuration files are correct and refer to the syslog for errors.
To check if the email has been received, look in /home/admin/Maildir/new:
cd /home/admin/Maildir/new/
ls -lash
cat xxxxxxxxxx.xxxxxxxxxxxxxxx.servername
If you see a email, the mail server (MTA) is working.
Installing Dovecot
Dovecot will be the secure Mail Delivery Agent (MDA) service. When an email arrives to it's destined mail server, it needs to be placed into the recipients inbox. Dovecot does this and supports both IMAP and POP3 protocols for connecting Mail User Agents (MUA), ie: Email clients. From the console, install Dovecot:
yum install dovecot
Edit the configuration file /etc/dovecot/dovecot.conf to enable IMAP:
protocols = imap
We'll need to specify the mail location by editing /etc/dovecot/conf.d/10-mail.conf:
mail_location = maildir:~/Maildir
Edit the file /etc/dovecot/conf.d/10-auth.conf and set the following parameters:
disable_plaintext_auth = no
auth_mechanisms = plain login
Lastly, modify /etc/dovecot/conf.d/10-master.conf:
unix_listener auth-userdb {
#mode = 0600
user = postfix
group = postfix
}
Set Dovecot to run on start up and start the service:
systemctl enable dovecot
systemctl start dovecot
To check if Dovecot is working, telnet via the IMAP protocol:
telnet mail.magrin.one imap
a1 LOGIN MyUsername MyPassword
a2 LIST "" "*"
a3 EXAMINE INBOX
a4 FETCH 1 BODY[]
a5 LOGOUT
Note: By design, Dovecot denies the 'root' account to sign in.
Installing Roundcube
Roundcube is a browser-based webmail client, using IMAP to connect to your inbox. Read more here and here. We begin by installing MariaDB server and Apache:
yum install mariadb-server mariadb-devel httpd
Enable both MariaDB and Apache to start when the system boots and enable the services:
systemctl enable mariadb
systemctl start mariadb
systemctl enable httpd
systemctl start httpd
To install Roundcube, we will need the EPEL repository:
yum install epel-release
yum install roundcubemail
Create the database for Roundcube:
mysql -u root -p
mysql> create database roundcube;
mysql> create user roundcube;
mysql> GRANT ALL PRIVILEGES ON roundcube.* TO roundcube@localhost IDENTIFIED BY 'mypassword';
mysql> flush privileges;
mysql> use roundcube;
mysql> source /usr/share/roundcubemail/SQL/mysql.initial.sql
mysql> quit
Note: The new config.inc.php should only contain options that differ from the ones listed in defaults.inc.php.
Edit the /etc/roundcubemail/config.inc.php file to set the parameters to access the database:
$rcmail_config['db_dsnw'] = 'mysql://roundcube:mypass@localhost/roundcube';
$rcmail_config['default_host'] = 'localhost';
Important: When enabling SSL for Roundcube, update the parameter hostname to ssl://localhost and restart the Apache service. Failure to do this will cause a "Connection to storage server failed." error when attempting to log on.
Change the 'default_host' to:
$config['default_host'] = 'ssl://magrin.one';
Modify the /etc/hosts file to include the following for the primary IP address name:
192.168.0.10 mail magrin.one mail.magrin.one
Restart the host to take effect. To access Roundcube externally, edit the /etc/httpd/conf.d/roundcubemail.conf and edit both Roundcubemail and Installer configurations:
alias /roundcubemail /usr/share/roundcubemail
# Define who can access the Webmail# You can enlarge permissions once configured<Directory /usr/share/roundcubemail/><IfModule mod_authz_core.c># Apache 2.4# Require localRequire all granted</IfModule><IfModule !mod_authz_core.c># Apache 2.2Order Deny,AllowAllow from all# Deny from all# Allow from 127.0.0.1# Allow from ::1</IfModule></Directory>
Repeat for <installer> section. Temporarily change the group permissions of the /etc/roundcubemail/config.ini.php before running the Roundcube Installer:
chgrp apache /etc/roundcubemail/config.ini.php
Follow the installer steps, copy the constructed config.ini.php in the wizard (as it has the DES hash) as the actual config for Roundcube.
Once Roundcube is running as desired, be sure to comment out the <installer> lines and rename the folder to append *.old to disable its access. Change the permissions back to the 'root' owner for config.ini.php after using the installer.
Edit the /etc/php.ini file to set the appropriate time zone:
date.timezone = UTC
Install the following PHP dependencies:
yum install php-mcrypt php-ZendFramework-Db-Adapter-Pdo-Mysql.noarch
The log may report errors related to encryption, uncomment the encryption parameter;
nano /etc/php.d/mcrypt.ini
extension=mcrypt.so
After configuring the above, restart the Apache server. Access Roundcube from your browser, ie: http://servername/roundcubemail/installer
Follow the steps and correct any anomalies as required. When you're finished, remove the Installer config under roundcubemail.conf and also disable it under the config.ini.php:
$rcmail_config['enable_installer'] = false;
Enter your credentials, ie: admin, user, etc... then click Login. The main screen should appear, showing the email(s) received when Postfix was previously tested. To enforce HTTPS by redirecting the URL, first enable tcp:443 in IPtables and install mod_ssl;
yum install mod_ssl
Now modify the config.inc.php file to enforce HTTPS:
$rcmail_config['force_https'] = true;
We will need to generate a self-signed certificate:
cd /home/user/tempfolder
openssl req -x509 -nodes -days 36500 -newkey rsa:2048 -keyout www.magrin.one.key -out www.magrin.one.crt
cd /etc/httpd/conf.d
Edit the ssl.conf file to utilise the newly created certificates:
SSLCertificateFile /etc/pki/tls/certs/www.magrin.one.crt
SSLCertificateKeyFile /etc/pki/tls/private/www.magrin.one.key
Copy the public key (www.magrin.one.crt) to /etc/pki/tls/certs folder and the private key (www.magrin.one.key) to the private folder and restart Apache.
Alternatively, if you've purchased a cert from a CA, for example RapidSSL, copy the intermediate.crt, www.magrin.one.ca-bundle and www.magrin.one.crt under the /etc/pki/tls/certs folder.
Also copy the private key www.magrin.one.key under /etc/pki/tls/private and restart Apache:
SSLCertificateFile /etc/pki/tls/certs/www.magrin.one.crt
SSLCertificateKeyFile /etc/pki/tls/private/www.magrin.one.key
SSLChainFileFile /etc/pki/tls/certs/intermediate.crt
To ensure HTTPS, SMTP and IMAP ports are accessible, we will need to update iptables to make some exceptions. To start, disable the firewalld service:
systemctl disable firewalldyum install iptables-servicessystemctl enable iptables
iptables-save > /etc/sysconfig/iptables
The example defines are required inbound ports needed:
# Firewall configuration written by system-config-firewall
# Manual customization of this file is not recommended.
*filter
:INPUT ACCEPT [0:0]
:FORWARD ACCEPT [0:0]
:OUTPUT ACCEPT [0:0]
-A INPUT -m state --state ESTABLISHED,RELATED -j ACCEPT
-A INPUT -p icmp -j ACCEPT
-A INPUT -i lo -j ACCEPT
-A INPUT -m state --state NEW -m tcp -p tcp --dport 25 -j ACCEPT
-A INPUT -m state --state NEW -m tcp -p tcp --dport 53 -j ACCEPT
-A INPUT -m state --state NEW -m udp -p udp --dport 53 -j ACCEPT
-A INPUT -m state --state NEW -m tcp -p tcp --dport 80 -j ACCEPT
-A INPUT -m state --state NEW -m tcp -p tcp --dport 443 -j ACCEPT
-A INPUT -m state --state NEW -m tcp -p tcp --dport 587 -j ACCEPT
-A INPUT -m state --state NEW -m tcp -p tcp --dport 993 -j ACCEPT
-A INPUT -j REJECT --reject-with icmp-host-prohibited
-A FORWARD -j REJECT --reject-with icmp-host-prohibited
COMMIT
Important: Be sure to validate the permissions for iptables file has both read and write access for root (owner) and that groups and others do not have any privileges.
Securing Postfix and Dovecot with SSL
Read more here. To enable TLS for SMTP, refer to 'Step 19: Enable TLS in Postfix' below. Install the required packages:
yum install cyrus-sasl cyrus-sasl-devel cyrus-sasl-gssapi cyrus-sasl-md5 cyrus-sasl-plain
Edit the /etc/postfix/main.cf file:
myhostname = mail.magrin.one
mydomain = magrin.one
myorigin = $mydomain
home_mailbox = Maildir/
#mailbox_command =
mynetworks = 192.168.0.0/24, 127.0.0.0/8
inet_interfaces = all
mydestination = $myhostname, localhost.$mydomain, localhost, $mydomain
relay_domains =
local_recipient_maps =
Configuring SMTP-AUTH: Edit /etc/postfix/main.cf as follows:
smtpd_sasl_local_domain =
smtpd_sasl_auth_enable = yes
smtpd_sasl_type = cyrus
smtpd_sasl_security_options = noanonymous
broken_sasl_auth_clients = yes
smtpd_sasl_authenticated_header = yes
permit_sasl_authenticated = permit_mynetworks,reject_unauth_destination
smtpd_recipient_restrictions =
Then modify /etc/postfix/master.cf and place these lines under SMTP:
smtps inet n - n - - smtpd
-o smtpd_sasl_auth_enable=yes
-o smtpd_reject_unlisted_sender=yes
-o smtpd_recipient_restrictions=permit_sasl_authenticated,reject
-o broken_sasl_auth_clients=yes
Edit or create a /usr/lib/sasl2/smtpd.conf file (32 bit) or /usr/lib64/sasl2/smtpd.conf (x64) for Postfix to allow PLAIN and LOGIN logins:
pwcheck_method: saslauthd
mech_list: plain login
Create the certificates for TLS:
mkdir /etc/postfix/ssl
cd /etc/postfix/ssl/
openssl genrsa -des3 -rand /etc/hosts -out smtpd.key 1024
chmod 600 smtpd.key
openssl req -new -key smtpd.key -out smtpd.csr
openssl x509 -req -days 3650 -in smtpd.csr -signkey smtpd.key -out smtpd.crt
openssl rsa -in smtpd.key -out smtpd.key.unencrypted
mv -f smtpd.key.unencrypted smtpd.key
openssl req -new -x509 -extensions v3_ca -keyout cakey.pem -out cacert.pem -days 3650
Configure Postfix for TLS. These additional lines need to either be added, modified or uncommented in main.cf:
smtpd_tls_auth_only = yes (Always authenticate using TLS)smtp_use_tls = yessmtpd_use_tls = yes
smtp_tls_note_starttls_offer = yes
smtpd_tls_key_file = /etc/postfix/ssl/smtpd.key
smtpd_tls_cert_file = /etc/postfix/ssl/smtpd.crt
smtpd_tls_CAfile = /etc/postfix/ssl/cacert.pem
smtpd_tls_loglevel = 1
smtpd_tls_received_header = yes
smtpd_tls_session_cache_timeout = 3600s
tls_random_source = dev:/dev/urandom
Edit /etc/dovecot.conf to specify the Mail Delivery Agent protocols; in our case, IMAP::
protocols = imap
If you get the "Connection to storage server failed." error when attempting to log into Roundcube, you need to modify the '$rcmail_config' line and restart Apache, read more here:
$rcmail_config['default_host'] = 'ssl://localhost';
If you encounter the "Connection to IMAP server failed." error with the 'ssl://domain.com' parameter configured for 'default_host', you will need to modify the /etc/hosts file for the loopback address entry and restart the host:
127.0.0.1 xxx xxx xxx magrin.one
Dovecot's original certificate locations:
Public key: /etc/pki/dovecot/certs/dovecot.pem
Private key: /etc/pki/dovecot/private/dovecot.pem
Backup the original SSL's. Then modify the /etc/pki/dovecot/dovecot-openssl.cnf file with the details that you'd like to appear in your certificate.
Copy both the mkcert.sh and dovecot-openssl.cnf files to a temporary directory. Modify the mkcert.sh to increase the certificate expiry to your liking, ie: 10 years (3650). Also ensure the script has executable rights.
Now run the script to generate the certificates. Modify /etc/dovecot/dovecot.conf to point to the newly created certificate paths and restartthe dovecot service after:
Public key:
Private key:
ssl_key = </etc/ssl/private/dovecot.pemYou will may need to reconfigure or simply open your email clients to accept the newly published certificates.
Email client configuration
Test with your favourite email client to validate that external mail delivery agents can communite, send/receive and manage you emails.
- IMAPS: mail.magrin.one:993 SSL/TLS
- SMTP: mail.magrin.one:25
- STARTTLS: mail.magrin.one:587 STARTTLS (with submission enabled in Postfix)
Route outbound mail to a smart host
Read more here and here. Should would wish to route emails from your MTA, skip this step. Using a smart host offers better chances for your emails being trusted and delivered.
Using a static IP from an ISP will likely give you grief and you may experience emails being marked as spam, even if you have set up a Sender Policy Framework (more on this later.
Execute the following commands to instruct Postfix to use a Smart Host (an External SMTP server) to route all outgoing emails too. In my example, I used Internode at the time as a smart host:
postconf -e 'relayhost = mail.internode.on.net:25'
postconf -e 'smtp_sasl_auth_enable = yes'
postconf -e 'smtp_sasl_password_maps = hash:/etc/postfix/sasl_passwd'
postconf -e 'smtp_sasl_security_options ='
touch /etc/postfix/sasl_passwd
Edit the sasl_passwd file to include the SMTP server address:port and the required credentials. If connecting to your ISP's SMTP, you'll need to supply your account credentials:
mail.internode.on.net:25 yourusername:yourpassword
Created a password hash file with the sasl_passwd file:
postmap hash:/etc/postfix/sasl_passwd
Test the password file:
postmap -q smtp.provider.com:25 /etc/postfix/sasl_passwd
You should see the credentials. Now removed the existing sasl_passwd file (not sasl_passwd.db) and then restarted the Postfix service.
Sender Policy Framework (SPF) TXT record
A simple record that only permits servers that have MX records in your zone file and mark incoming mail as a SOFTFAIL if that have not originated from your MX's:
magrin.one. IN TXT "v=spf1 mx a ~all"
Only permit servers that have MX records in your zone file and your mark as a FAIL (reject) if emails haven't originated from your MX's:
magrin.one. IN TXT "v=spf1 mx a -all"
This instructs the receiving MTA to neutrally accept (not a pass or fail) your mail from your MX's and the smart host specified:
magrin.one. IN TXT "v=spf1 mx a ip4:150.101.137.131/32 a mx ?all"
The following specifically informs the receiving mail gateway to only accept mail from your MX's or following IP's and to always accept (pass) incoming emails:
magrin.one. IN TXT "v=spf1 mx a ip4:150.101.137.131/32 ip4:150.101.137.141/32 ip4:150.101.137.143/32 +all"
Increase message size
Read more here. At the time of writing, Postfix restricts attachment sizes to 10MB (10240000 bytes). To check the current maximum size:
postconf | grep message_size_limit
To change the value to 25 MiB (Size*1024):
postconf -e message_size_limit=26214400
For Roundcube, you will need to also need to modify the /etc/php.ini file to increase maximum size and upload time. Read more here:
post_max_size = 20M
upload_max_filesize = 20M
max_input_time = 60
Mail filtering with SpamAssasin & ClamAV
Read more here. It is strongly recommended to have some email filtering/security to prevent malicious emails being delivered.
SMTP traffic on port 25 will be re-directed from Postfix MTA to Amavisd on port 10024 for processing. When no problems are detected with the attachments, the email will be fed back to Postfix on 10025 and then either routed to a remote MTA for outgoing mail or passed onto the mail client.
To begin, install SpamAssassin:
yum -y install spamassassin
The Amavis-new will call on spamd, so the SpamAssassin service doesn't need to be enabled upon start up. It'll also create a daily cron task to automatically update its rules. To install ClamAV and Amavisd-new:
yum -y install clamav clamav-filesystem clamav-data clamav-lib clamav-update clamav-server clamav-server-systemd
yum -y install amavisd-new
Backup and edit the /etc/amavisd/amavisd.conf file to update the following:
$mydomain = 'magrin.one';
$myhostname = 'mail.magrin.one';
$QUARANTINEDIR = '/var/quarantine'; # -Q
You will need to create the /var/quarantine folder manually, the designated path for all quarantined emails. Make sure your change both the ownership and group to grant Amavis access to it:
chmod go-rwx /var/quarantine
chown amavis /var/quarantine
chgrp amavis /var/quarantine
Configure ClamAV to fetch the latest definitions hourly via crontab:
crontab -e
0 * * * * /usr/bin/freshclam --quiet
Edit /etc/freshclam.conf to comment out the Example line or else it won't update. SpamAssassin has a predefined cron.daily task created, you can also create a daily cron job of your own:
0 16 * * * /usr/bin/sa-update && systemctl restart spamassassin
Include the following lines in the /etc/postfix/main.cf file to tell Postfix that Amavisd-new will listen on port 10024:
#use amavisd as filter on port 10024
content_filter=amavisfeed:[127.0.0.1]:10024
Edit the /etc/postfix/master.cf to include the following lines and restart the Postfix service:
amavisfeed unix - - n - 2 lmtp
-o lmtp_data_done_timeout=1200
-o lmtp_send_xforward_command=yes
-o lmtp_tls_note_starttls_offer=no
~
127.0.0.1:10025 inet n - n - - smtpd
-o content_filter=
-o smtpd_delay_reject=no
-o smtpd_client_restrictions=permit_mynetworks,reject
-o smtpd_helo_restrictions=
-o smtpd_sender_restrictions=
-o smtpd_recipient_restrictions=permit_mynetworks,reject
-o smtpd_data_restrictions=reject_unauth_pipelining
-o smtpd_end_of_data_restrictions=
-o smtpd_restriction_classes=
-o mynetworks=127.0.0.0/8
-o smtpd_error_sleep_time=0
-o smtpd_soft_error_limit=1001
-o smtpd_hard_error_limit=1000
-o smtpd_client_connection_count_limit=0
-o smtpd_client_connection_rate_limit=0
-o receive_override_options=no_header_body_checks,no_unknown_recipient_checks,no_milters
-o local_header_rewrite_clients=
-o smtpd_milters=
-o local_recipient_maps=
-o relay_recipient_maps=
Enable Amavisd-new to upon boot up and start the Amavisd-new service:
systemctl enable amavisd
systemctl start amavisd
Validate that both Amavisd service is working:
telnet localhost 10024
ehlo localhost
quit
telnet localhost 10025
ehlo localhost
quit
Edit /usr/lib/systemd/system/postfix.service to include amavisd.service and restart the amavisd service:
After=syslog.target network.target amavisd.service
@bypass_header_checks_maps = (1);
Disabling IPv6
Important: Skip this step if you are using SELinux as this will cause problemsand generate volumes of errors within syslogs.
Disabling IPv6 improves boot up times, in some cases increase security and most services don't use IPv6. Refer to this link for an explanation on how to properly disable IPv6 with SELinux.
Both Postfix and Dovecot require an additional line to instruct them to operate/listen on IPv4 only. For Postfix. Edit the /etc/postfix/main.cf to include the following line:
inet_protocols = ipv4
Edit the /etc/dovecot/dovecot.conf to include the following line:
listen = *
Restart both services to reload their configurations:
service postfix restart
service dovecot restart
Regarding BIND, edit the /etc/named.conf file to prevent IPv6 recursion. Comment out the following line:
// listen-on-v6 port 53 { ::1; };
For BIND to only use IPv4, edit the /etc/sysconfig/named file to include the following line and restart the named service:
OPTIONS="-4"
To completely disable IPv6, begin by updating the /etc/sysctl.conf file to include the following line:
net.ipv6.conf.all.disable_ipv6 = 1
net.ipv6.conf.default.disable_ipv6 = 1
In the /etc/sysconfig/network file, include the following lines:
NETWORKING_IPV6=no
IPV6INIT=no
In the /etc/modprobe.d/blacklist.conf file, include the following lines:
blacklist net-pf-10
blacklist ipv6
In /etc/sysconfig/network-scripts/ifcfg-eth0, disable IPv6 support. Stop and disable the ip6tables service:
service ip6tables stop
chkconfig ip6tables off
Prevent the IPv6 module from loading up and restart the network service:
echo "install ipv6 /bin/true" > /etc/modprobe.d/ipv6_disabled.conf
Hardening and tweaking Apache
Prevent httpd revealing version of the service and OS installed. This can be a major security threat. To prevent Apache to not to display these information, add the following lines in httpd.conf and restart the service:ServerSignature Off
ServerTokens Prod
Disable unnecessary modules. To list all enabled ones:
grep LoadModule /etc/httpd/conf/httpd.conf
Comment out the following if not in use:
mod_include.somod_info.so
mod_userdir.so
mod_cgi.so
To tell Apache not to automatically load the module when the service starts, comment out the LoadModule line (if required):
#LoadModule cgi_module modules/mod_cgi.so
Disable the symlinks functionality. Apache follows symlinks by default. Arbitrary code comprising your web server may take advantage of this function, creating links to sensitive files (ie: /etc/passwd). For httpd to ignore symlinks, place a minus (-) symbol in front of FollowSymLinks:
Options -FollowSymLinks
Important: Disabling FollowSymLinks may break non-www to www redirects configured by your .htaccess.
Disable SSLv2/3 and strengthen Apache's SSl cipher for PCI (Payment Card Industry) compliance. OpenSSl v2/3 encryption protocols are deprecated and no longer considered safe to use.
Most (if not all) web commonly used browsers these days should now be using higher levels of encryption like TLS v1 or greater, but may drop to older versions for compatibility.
With the exception of IE6 and other browsers, Apache should be able to serve content securely to modern browsers without problems.
To disable these, edit the /etc/httpd/conf.d/ssl.conf and modify the following line and restart the httpd service:
SSLProtocol all -SSLv2 -SSLv3
SSLHonorCipherOrder on
# Kills off IE6/8 on XP and JRE 6u45, 7u25 and 8b132
SSLCipherSuite kEDH:HIGH:!MD5:!RC4:!3DES:!AES128:!CAMELLIA128:!MEDIUM:!LOW:!EXP:!aNULL:!eNULL
The newer cipher suite parameter mitigates against the POODLE vulnerability (CVE-2014-3566). The site can be benchmarked against Qualys SSL Tester.
OpenSSL may default to sha1, which is considered unsafe and is no longer supported from 2016 onwards. To default to sha256 when creating certificates:
nano /etc/pki/tls/openssl.cnf
default_md = sha256
Alternatively you can specify to use sha256 when generating a certificate, for example:
openssl req -new -sha256 -key private.key > new_sha256.csr
Redirecting URLs from Your Root Domain to a sub-domain. Configure Apache automatically redirect visitors from magrin.one to www.magrin.one. Handy if your SSL certificate is configured with the www sub-domain. Start by creating an .htaccess file under the www root folder. In my case, /usr/share/roundcubemail:
touch /usr/share/roundcubemail/.htaccesschmod go+r /usr/share/roundcubemail/.htaccess
nano /usr/share/roundcubemail/.htaccess
Add the following within it:
RewriteEngine onRewriteCond %{HTTP_HOST} ^magrin\.com$ [NC]
RewriteRule ^(.*)$ http://www.magrin.one/$1 [R=301,L]
Finally edit the httpd.conf to enable AllowOverride to All and restart Apache:
#AllowOverride NoneAllowOverride All
Roundcube Plugins
Filters: Read more here. The Filters plugin enables users to create their own mail rules based on To, From, CC or Subject and move the mail. This setting takes precedence at the MDA level, so the rule will apply to all IMAP clients for a particular user.
To install, extract the filters-2.1.2.zip archive, rename the folder to filters and move to /tmp on the host
cd /tmp
chmod -R go-w filters
chown -R root filters
chgrp -R root filters
Move the filters folder into /usr/share/roundcubemail/plugins and edit the /etc/roundcubemail/main.inc.php file to load the plugin:
$rcmail_config['plugins'] = array('chbox', 'filters');
Restart the Apache service and under Settings > Filters and create your desired mail rule.
Checkbox (chbox): Read more here. This plugin allows you to mark emails with a checkbox, a option not included with Roundcube mail by default. To install, extract the rcplugin_chbox-master.zip archive, rename the folder to chbox and move to /tmp on the host.
cd /tmp
chmod -R go-w chbox
chown -R root chbox
chgrp -R root chbox
Move the chbox folder into /usr/share/roundcubemail/plugins and edit the /etc/roundcubemail/main.inc.php file to load the plugin:
$rcmail_config['plugins'] = array('chbox', 'filters');
Restart the Apache service. In Roundcube, click on the cog (List options...) and tick Selector. Move the field to your desired location.
Google Authenticator (twofactor_gauthenticator): Refer to here and here for more information. Start by installing the dependencies:
yum -y install php-soap git
Retrieve the plugin from GitHub:
cd /usr/share/roundcube/plugins
git clone https://github.com/alexandregz/twofactor_gauthenticator.git
Configure Roundcube to initialize the plugin and after restart Apache:
cd /etc/roundcubemail
nano main.inc.php
config['plugins'] = array('blablabla','twofactor_gauthenticator');
Log into Roundcube > Settings > 2step Google verification and click the ‘Activate' checkbox. Generate a secret code by selecting 'Create secret', which'll create 16 random characters. If desired, set a recovery code.
Note: If you change the Secret Code after generating one, you'll need to rescan the QR code in Google Authenticator app.
Select [Save] and [Show QR Code] button. Scan QR Code with Google Authenticator or desired OTP app. Validate by entering the generated OTP from the app with the [Check code] option, and complete by selecting [Save] and [Logout].
Log in as normal and enter either the generated one time passcode for fixed recover code(s).
Important: If you have lost access to the soft-token or forgetting recovery PIN (if set), you have two options; Disable the plugin entirely. If re-enabled, the secret code is store in MariaDB. You can also delete the field containing the 16 digit Secret Code or delete the user’s entire row under the 'users' table within the 'roundcube' database.
Name Resolution Order
Changed the name resolution from 'Hosts file' and 'DNS' to include the domain and FQDN of your mail server:
cat /etc/hosts
127.0.0.1 localhost.localdomain localhost.localdomain localhost4 localhost4.localdomain4 localhost magrin.one
192.168.0.10 mail magrin.one mail.magrin.one
Reload both the networking and named services.
Configuring Apache with a Trusted CA Certificate
Read more here and here. First you will need to purchase either a 1/2/3/4/5 certificate from a CA (ie: RapidSSL/GeoTrust via Namecheap (aka ssls.com). SHA256 bit Signature Algorithm, 2048 bit Key. To begin, generate a private key:
openssl genrsa -des3 -out www_domain_com.key 2048openssl req -new -key www_domain_com.key -out www_domain_com.csr
Do not enter an email address, challenge password or an optional company name when generating the CSR. Copy/paste the contents of the *.csr into the CA's portal and follow their instructions as directed by the CA; in this example, I used RapidSSL.
Copy and paste it into blank files, ie: www_domain_com.crt (Public cert) and intermediate.crt (Intermediate cert). You can also download the public certificate from SSLs.
Alternatively you should be able to retrieve them direct from RapidSSL User Portal, download both the public (under 'Certificate') and certificate issuer (under 'Additional Certificates' > Formats = Certificate Issuer).
Either retain or change the file names of the downloaded certs. Do not use double extension names. Configure the ssl.conf with the certificate locations (Names of the certificates can differ):
SSLCertificateFile /etc/pki/tls/certs/public.crt <-- Public
SSLCertificateKeyFile /etc/pki/tls/private/private.key <-- Private
SSLCertificateChainFile /etc/pki/tls/certs/public.crt <-- Public
SSLCACertificateFile /etc/pki/tls/certs/issuer.crt <-- Cert Issuer
or
SSLCertificateFile /etc/pki/tls/certs/www_domain_com.crt <-- Public
SSLCertificateKeyFile /etc/pki/tls/private/www_domain_com.key <-- Private
SSLCertificateChainFile /etc/pki/tls/certs/intermediate.crt <-- Intermediate
Some versions of Apache will not accept the SSLCertificateChainFile directive, so try using SSLCACertificateFile instead. Unless you decrypt the private key, Apache will always prompt for the paraphrase when the service starts/restarts. To remedy this;
openssl rsa -in www_domain_com.key -out www_domain_com.key.unencrypted
mv -f www_domain_com.key.unencrypted www_domain_com.key
Finally restart Apache service. The trusted certificate should work in the browser. Make sure you're using the following cipher set up in your ssl.conf:
SSLProtocol all -SSLv2 -SSLv3 SSLHonorCipherOrder on SSLCipherSuite kEDH:HIGH:!MD5:!RC4:!3DES:!AES128:!CAMELLIA128:!MEDIUM:!LOW:!EXP:!aNULL:!eNULL
Configure DKIM and DMARC
These are additional methids to validate that the sending host is genuine and not spoofing your domain. To start, we will add a TXT record to the DNS zone file and install the opendkim package:
yum install opendkim
export domain=magrin.one
mkdir /etc/opendkim/keys/$domain
cd /etc/opendkim/keys/$domain
Create a public/private key (The default command creates a 1024 bit key, which is fine):
opendkim-genkey -d $domain -s default
chown -R opendkim:opendkim /etc/opendkim/keys/$domain
echo "default._domainkey.$domain $domain:default:/etc/opendkim/keys/$domain/default.private" >> /etc/opendkim/KeyTable
echo "*@$domain default._domainkey.$domain" >> /etc/opendkim/SigningTable
If you have internal hosts relaying through that you want to sign mail for to:
echo "192.168.0.0/24" >> /etc/opendkim/TrustedHosts
Update DNS to include the DomainKey:
cat /etc/opendkim/keys/$domain/default.txt >> /var/named/magrin.one.hosts
Open the zone file to clean up the entry created above:
default._domainkey.magrin.one. IN TXT "v=DKIM1; k=rsa; p=MIGfMA0GCSqGSIb3DQEBAQUAA4GNADCBiQKBgQCZ011bA8zhh26zjF4yRw3gAAWAAAZfG4E8HtymZFMfnDaxO3q8BI/Mao4+Y0QAkzcTDIRcfc6fGM6PhRbzBfVa4/UBJBkR8HCRGzP7AhZBFP9kNKqysyJ+uVPtIJqJ1Ja0zkOVJLix5vpM2Xjp6qkMUwLozbW8x7kx6hb4lBV+GwIDAQAB"
Increment serial number in DNS zone file and restart the named service. Edit /etc/opendkim.conf and change the following values:
nano -w /etc/opendkim.conf
Mode sv
Domain magrin.one
Canonicalization relaxed/relaxed
Selector default
MinimumKeyBits 1024
KeyFile /etc/opendkim/keys/magrin.one/default.private
KeyTable /etc/opendkim/KeyTable|
SigningTable refile:/etc/opendkim/SigningTable
Configure Postfix so opendkim can interact with it by adding the following entries;
nano -w /etc/postfix/main.cf
#OpenDKIM Setup
smtpd_milters = inet:localhost:8891
non_smtpd_milters = inet:localhost:8891
milter_default_action = accept
If required, make sure the mail servers host name matches the public name under /etc/host:
192.168.0.10 mail.magrin.one
and /etc/sysconfig/network
HOSTNAME=mail.magrin.one
Enable opendkim services for between 2-5 start levels:
chkconfig --level 2345 opendkim on
Restart the server if the host name was updated or restart affected services:
systemctl start opendkim
systemctl restart postfix
systemctl restart named
To verify DKIM is working, test the record with MXToolbox's DKIM test (Specify the 'default' for the Selector value, ie: default._domainkey.magrin.one.). You can also validate the record with OTA's SPF & DMARC tester. Another test is to send an email to both a Gmail and Hotmail account. Monitor the maillog live;
tail -f /var/log/maillog
For the DMARC set up, create the following DNS record:
_dmarc.magrin.one. IN TXT "v=DMARC1; p=reject; rua=mailto:admin@magrin.one, mailto:admin@magrin.one"
Use the record below test the values using MXToolbox. If you experience an invalid/incorrect syntax error, change the DMARC vaule to none;
_dmarc.magrin.one. IN TXT "v=DMARC1; p=none"
Restart the named service. The above TXT record instructs any mail filters to still accept any email if both the SPF and DKIM don't validate the originating source.
Finally, validate the record with OTA's SPF & DMARC tester and also use a Gmail account to see whether the DMARC record and aligning records (SPF and DKIM) are correct.
Enable TLS in Postfix
Enabling TLS is useful for the following scenarios:
- Inbound email clients supporting/restricted to port 587
- To support servers using sSMTP (via a nominated account) to send emails to your mail server as its limited to TLS 587 for secure transmission
- If the ISP blocks port 25
Edit the /etc/postfix/master.cf file to uncomment the following by remove the # in front of the line from:
#submission inet n - n - - smtpd
submission inet n - n - - smtpd
Allow the inbound port in iptables and restart the service:
-A INPUT -m state --state NEW -m tcp -p tcp --dport 587 -j ACCEPT